Tuya Wifi Zigbee 110 V 220 V 80 A Monophasé Bidirectionnel Compteur d'Énergie Intelligent Minuteur Moniteur de Consommation d'Énergie Compteur KWh
Tuya Wifi Zigbee 110 V 220 V 80 A Monophasé Bidirectionnel Compteur d'Énergie Intelligent Minuteur Moniteur de Consommation d'Énergie Compteur KWh
Impossible de charger la disponibilité du service de retrait
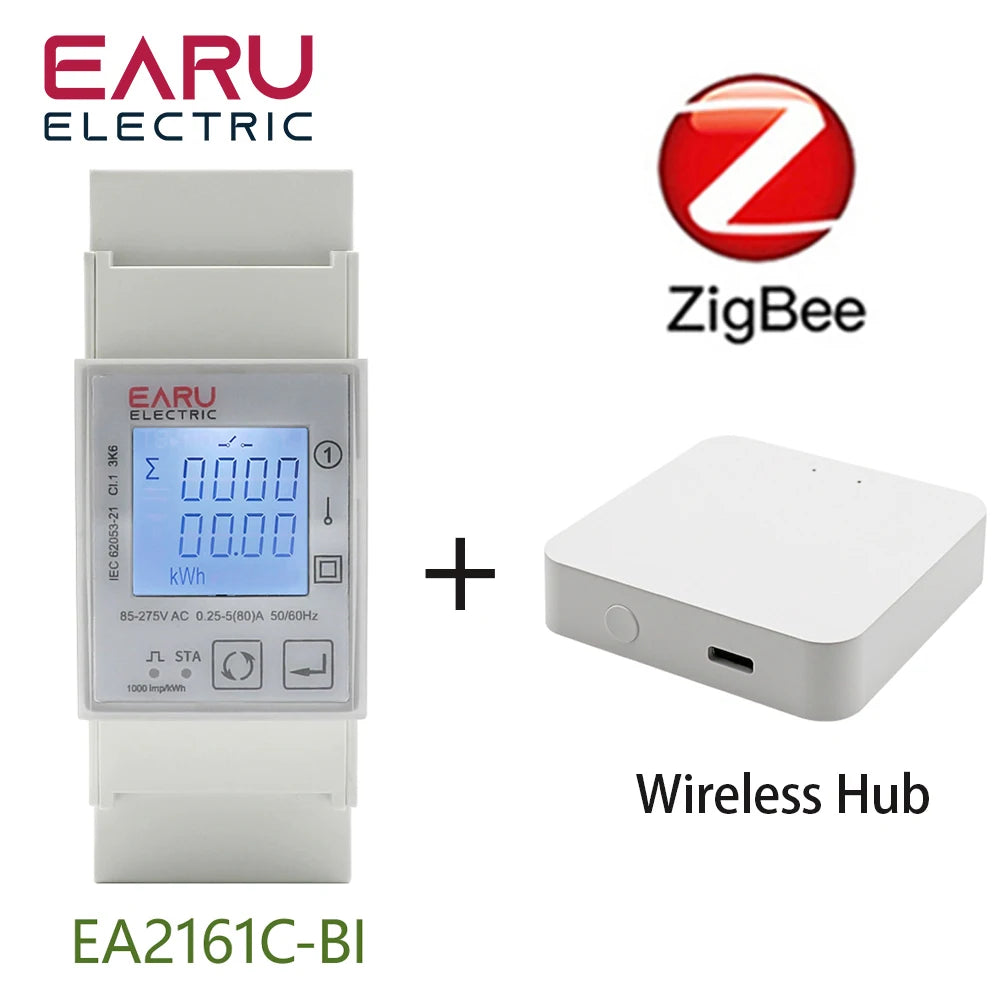
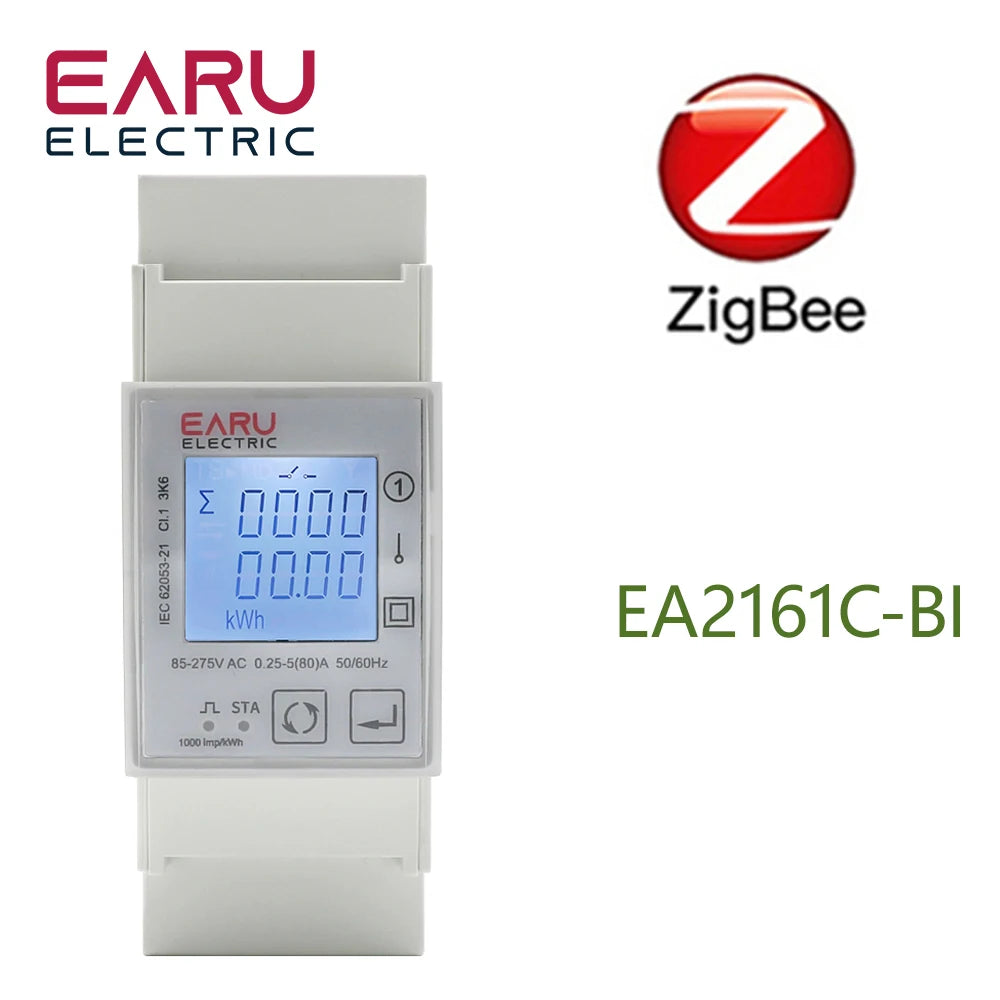
⚡ Compteur d'énergie intelligent monophasé bidirectionnel Tuya Wifi Zigbee 110V 220V 80A avec minuterie et surveillance de la consommation électrique kWh
Améliorez votre système avec notre compteur d'énergie intelligent monophasé bidirectionnel Tuya Wifi Zigbee 110V 220V 80A haute performance, doté d'une minuterie et d'un moniteur de consommation électrique KWh. Conçu pour la fiabilité, l'efficacité et une intégration transparente avec les configurations modernes.
📌 Avantages clés
- ✅ Conception à haut rendement pour des performances supérieures
- ✅ Dissipation thermique et durabilité optimisées
- ✅ Compatibilité plug-and-play pour une intégration facile
- ✅ Idéal pour un usage industriel et résidentiel
📄 Spécifications techniques
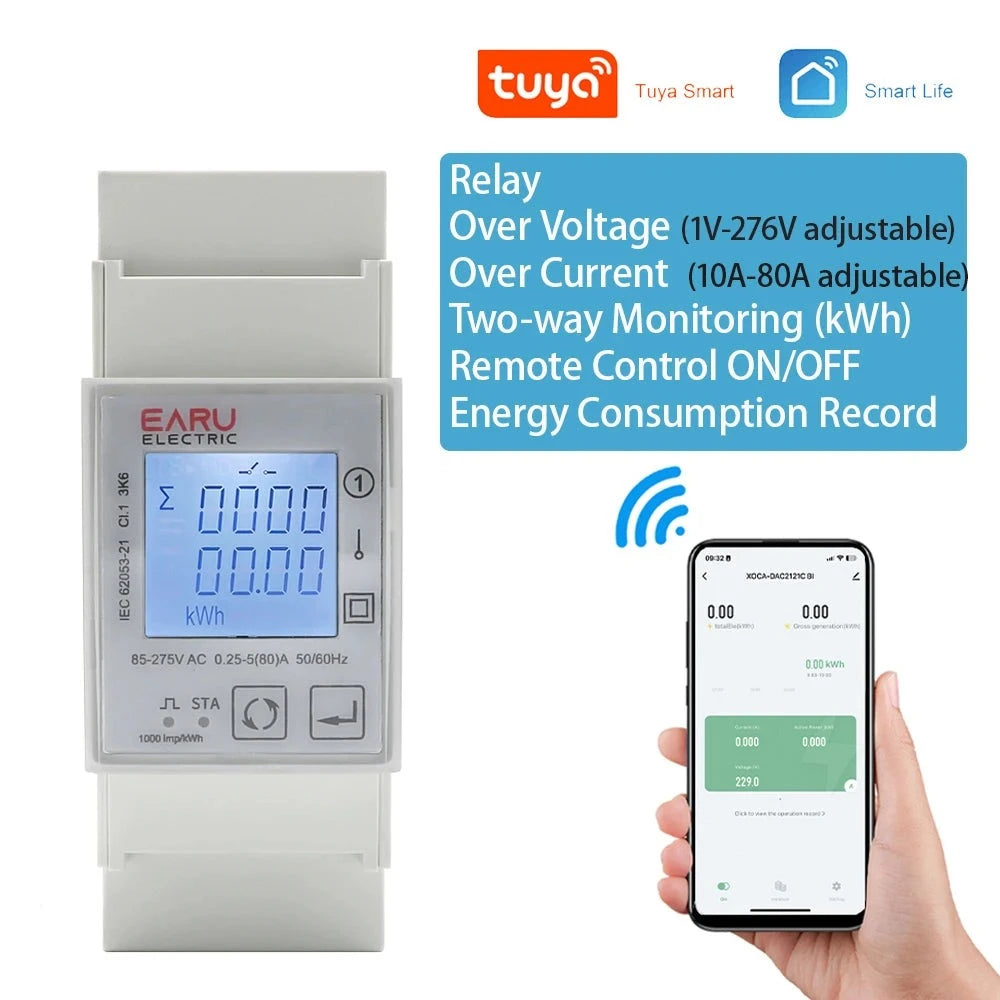
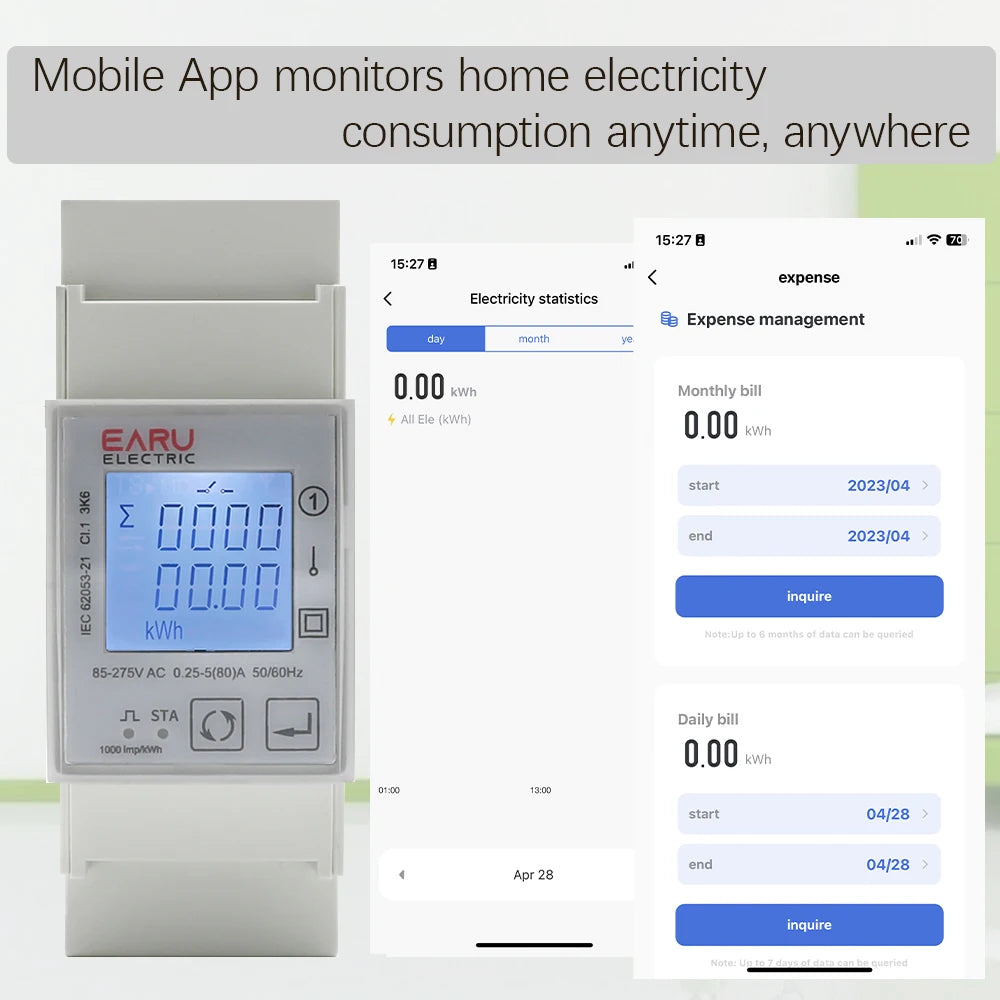
Suivez et surveillez facilement votre consommation d'énergie grâce au compteur d'énergie bidirectionnel intelligent monophasé Tuya Wifi Zigbee 110V 220V 80A. Grâce à sa minuterie intégrée, vous pouvez mesurer et gérer précisément la consommation électrique. Compatible avec les tensions 110V et 220V, ce compteur intelligent offre une solution pratique et efficace pour surveiller la consommation d'énergie de votre maison ou de votre entreprise.
SPÉCIFICATIONS
- Plage de courant réglable : 10-80A (réglable)
- Plage de surtension réglable : 1V-276V (réglable)
- Fonction 1 : Protection contre les surtensions
- Fonction 2 : Protection contre les surintensités
- Fonction 3 : Limiteur de courant
- Fonction 4 : Télécommande ON / OFF
- Fonction 5 : Enregistrement de la consommation d'énergie
- Application : Tuya
- Lecture maximale de l'énergie : 999999.99 kWh/kVarh
- Fréquence d'impulsion : 1000imp/kWh
- Écran d'affichage : LCD avec rétroéclairage
- is_customized : Oui
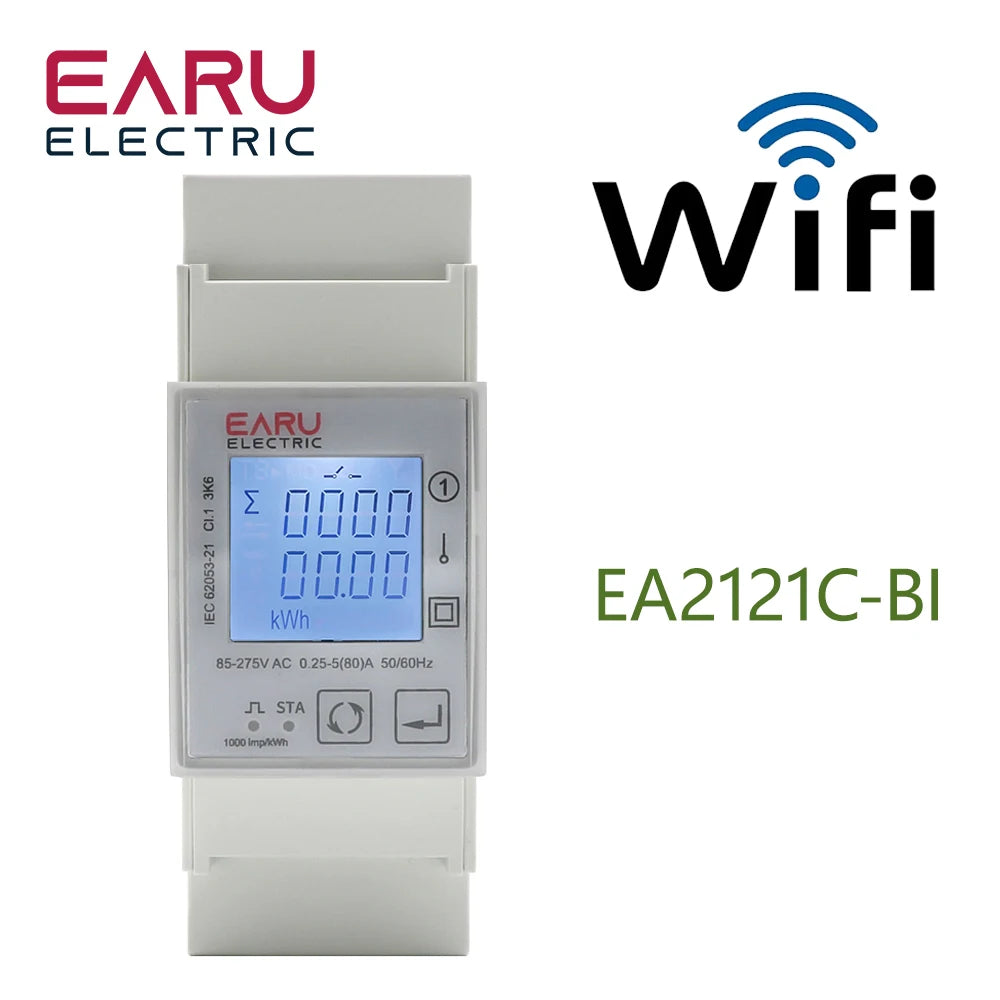
- Protocole : WiFi/Zigbee
- Nom de marque : EARUELETRIC
- Alimentation : CA
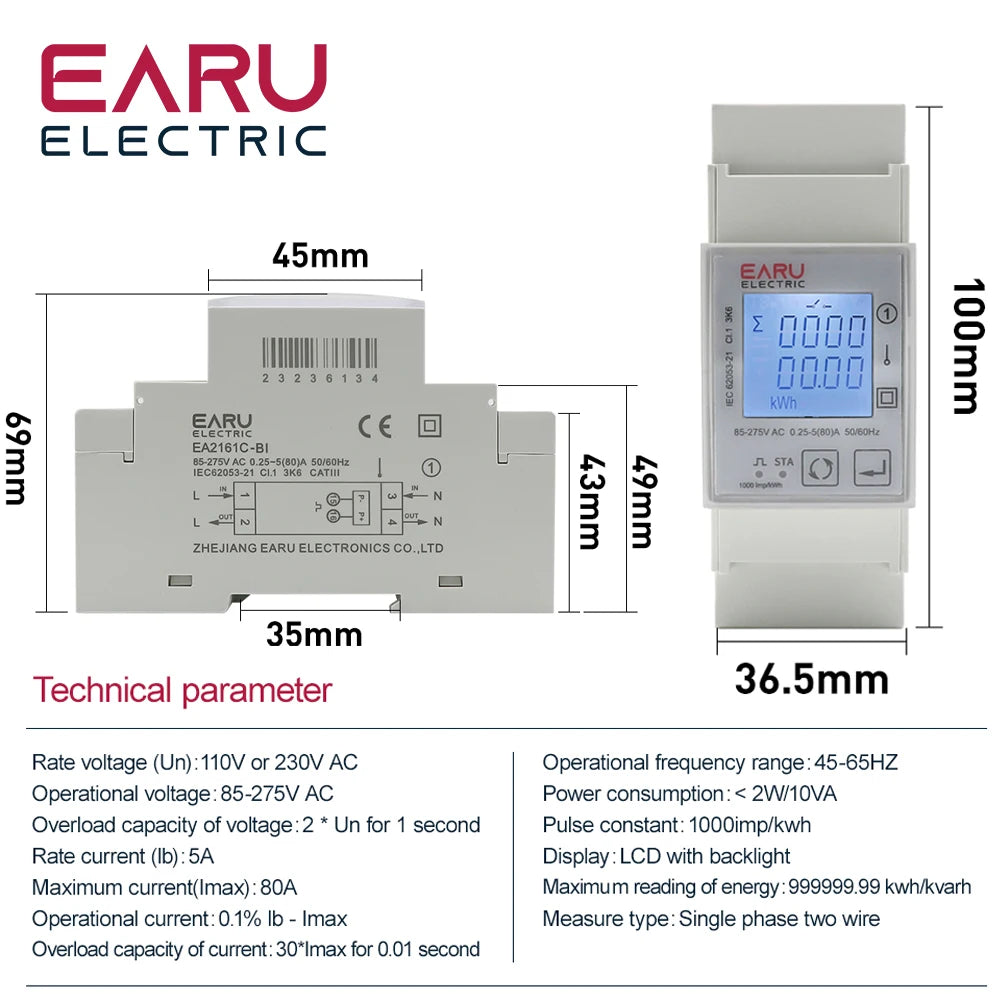
- Numéro de modèle : EA2121C-BI/EA2161C-BI
- Type d'affichage : LCD
- Classe de précision : 1%
- Dimensions : 100mm*36mm*68mm
- Tension nominale : 220V
- Température de fonctionnement : -25-55℃
- Plage de mesure d'énergie : 999999.99 kWh/kVarh
- Phase : monophasé
- Courant de fonctionnement max : 80A - 99A
- Tension de sortie : AC85-275V
- Fournitures de bricolage : ÉLECTRIQUE
Notre usine peut fournir un service OEM pour fabriquer cet appareil avec votre marque, votre logo, si vous avez besoin, n'hésitez pas à contacter l'acheteur!
Fonctionnalité du produit
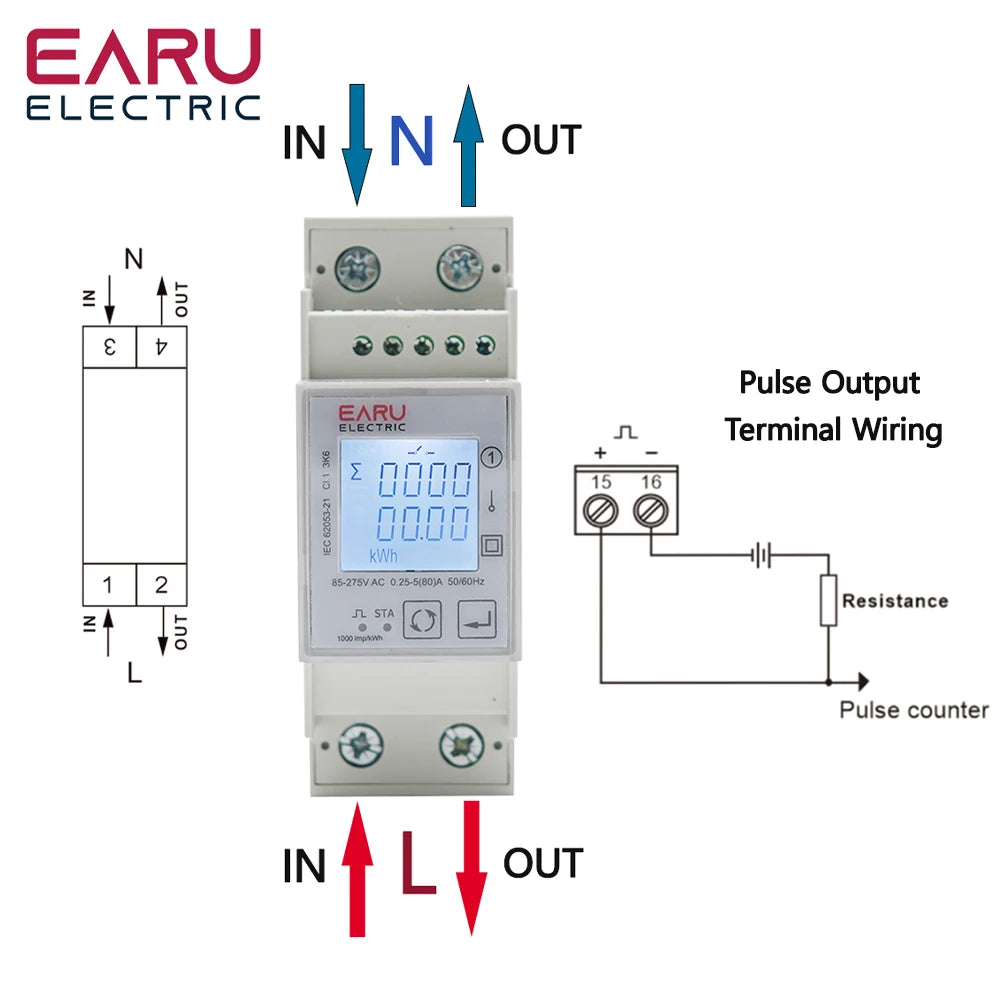
- Accès direct maximum de 80A
- Largeur standard de 2 modules, installation sur rail DIN TH35-7.5
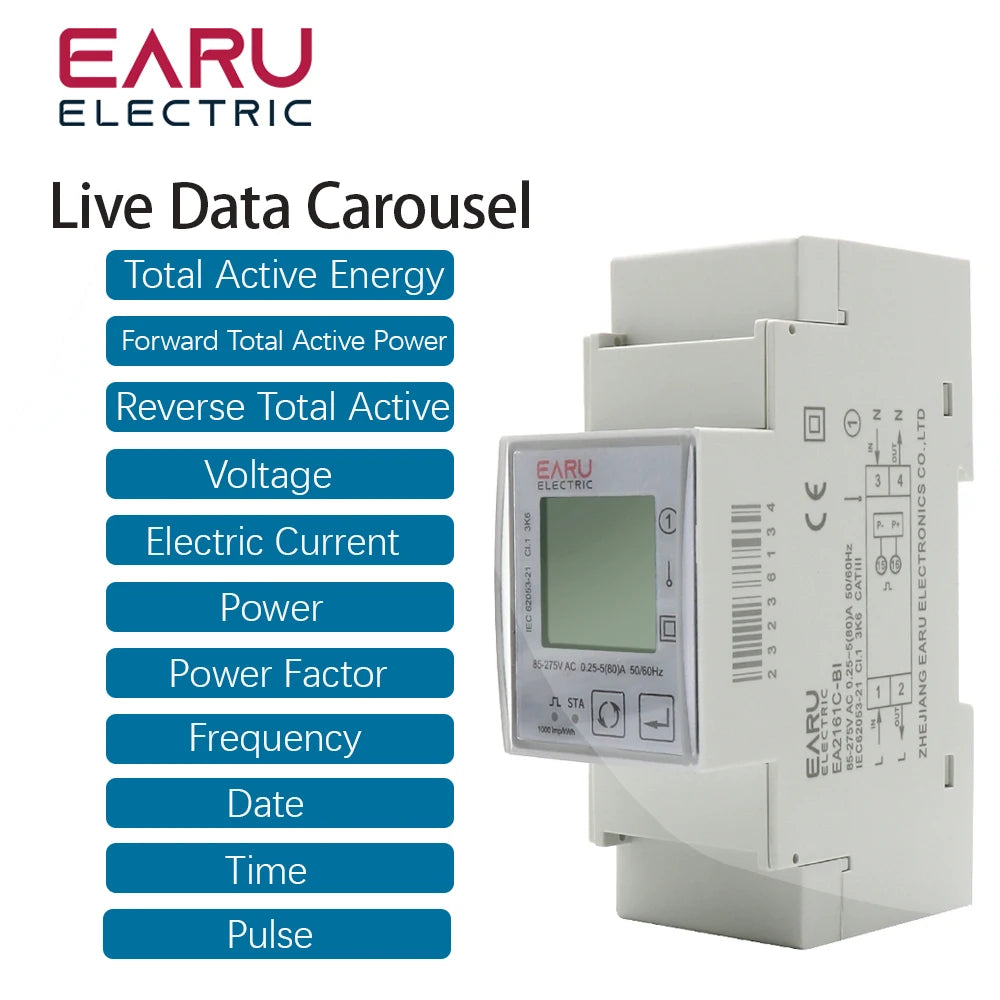
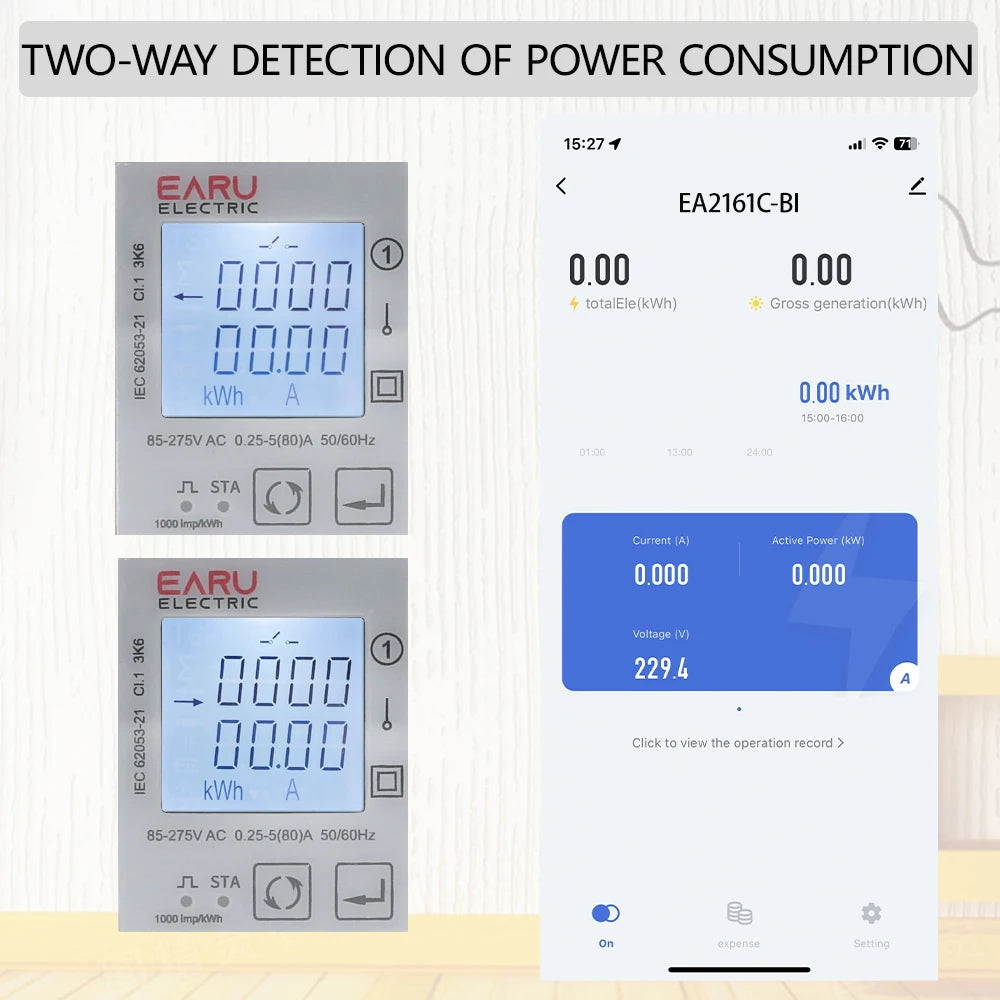
- Prise en charge du comptage d'énergie électrique bidirectionnel et multi-tarif, et fourniture de statistiques mensuelles et quotidiennes de consommation d'électricité
- Relais intégré, prenant en charge la commutation à distance et fournissant des enregistrements d'opérations de relais
- Prend en charge la fonction de protection automatique de coupure d'alimentation de l'alarme de surveillance des paramètres de consommation électrique (prend en charge jusqu'à deux surveillances d'alarme)
Alimentation : 230V CA 50/60Hz
Spécification du produit
- Protection contre les surtensions 1V-276V (réglable) (par défaut : 276)
- Protection contre les surintensités 10A-80A (réglable) (par défaut : 10A)
- Voltmètre
- Ampèremètre
- Compteur d'énergie
- Relais (ON/OFF)
- Fréquence d'impulsion 1000imp/kWh
.Description de la définition des boutons
Description de la fonction générale
Fonction multi-tarifs
La fonction multi-tarifs fait référence à la fonction permettant au compteur de réaliser une mesure de la quantité électrique par plages horaires. Le compteur de puissance divise les 24 heures d'une journée en plusieurs périodes, puis attribue un numéro de tarif à chaque période. Le compteur de puissance accumule ensuite la quantité d'électricité par division de temps selon la période prédéfinie, et la stocke à la position du numéro de tarif correspondant à chaque période, afin de réaliser la fonction de mesure de l'électricité par division de temps.
Le compteur utilise la méthode de corrélation du numéro de tarif au point de départ pour réaliser la division des segments tarifaires. Le compteur de puissance prend en charge jusqu'à 8 points de départ et jusqu'à 4 segments tarifaires (T1, T2, T3 et T4).
Figure 3-1 : Les points de départ du segment tarifaire
Comme le montre la Figure 3-1, 06:10 est désigné comme l'heure de début du tarif 1 (T1), 12:00 comme l'heure de début du tarif 2 (T2), 18:00 comme l'heure de début du tarif 3 (T3), 21:00 comme l'heure de début du tarif 4 (T4), de sorte que la plage horaire du tarif 1 est de 06:10 à 12:00, la plage horaire du tarif 2 est de 12:00 à 18:00, la plage horaire du tarif 3 est de 18:00 à 21:00, la plage horaire du tarif 4 est de 21:00 au lendemain 06:10.
Remarque : Les paramètres tarifaires peuvent être définis par des commandes de communication (veuillez vous référer au document de protocole de communication pertinent pour l'adresse d'enregistrement).
3.2. Définition du gel mensuel et du gel quotidien
Le compteur DAC2121C offre la fonction statistique de la consommation d'électricité mensuelle et quotidienne. Pour le moment de gel mensuel et quotidien, une opération de réglage libre peut être réalisée via l'application Tuya. Le compteur peut surveiller l'heure actuelle en temps réel, lorsque l'heure atteint la date de gel mensuel définie, le compteur gèlera automatiquement la consommation d'électricité mensuelle; lorsque l'heure atteint l'heure de gel quotidien définie, le compteur gèlera automatiquement l'heure de gel quotidien. La définition de la règle de gel est détaillée ci-dessous:
3.2.1. Règles de gel mensuel
Le gel mensuel est réglé par la valeur de la date. Lorsque l'heure atteint 00:00 de la date définie, le compteur effectuera l'opération de gel de la quantité d'électricité utilisée et la sauvegardera comme consommation d'électricité du mois précédent. Définition de la règle de la date de gel mensuel : la date de gel mensuel est réglée avant 15 jours (y compris 15 jours), lorsque l'énergie gelée est divisée en consommation d'électricité du mois précédent, et la date du gel mensuel est réglée après 15 jours, lorsque le gel mensuel agit, l'énergie gelée est divisée en consommation d'électricité du mois en cours.
Exemple 1:
La date de gel mensuel est fixée au 5, en supposant que la date actuelle est le 4 juillet à 20:00, alors lorsque l'heure atteindra 00:00 le 5 juillet, le compteur effectuera l'opération de gel de la consommation mensuelle d'électricité, divisant la consommation d'électricité gelée pour juin (du 5 juin à 00:00 au 5 juillet à 00:00).
Conformément aux règles de gel ci-dessus :
L'interrogation de la consommation d'électricité de juillet du compteur avant le 5 juillet à 00:00 affichera 0, car le compteur n'a pas atteint la date de gel mensuel, de sorte que l'énergie accumulée à ce moment-là est toujours la consommation d'électricité de juin.
Exemple 2:
La date de gel mensuel est fixée au 27. En supposant que l'heure actuelle est le 26 juillet à 20:00, alors lorsque l'heure atteindra 00:00 le 27 juillet, le compteur effectuera l'opération de gel de la consommation mensuelle d'électricité, en divisant la consommation d'électricité gelée pour juillet (du 27 juin à 00:00 au 27 juillet à 00:00).
3.2.2 Règles de gel quotidien
Le gel quotidien est réglé par la valeur du point temporel. Lorsque l'heure atteint le point temporel défini, le compteur gèlera la quantité d'électricité utilisée et l'enregistrera comme consommation d'électricité de la veille.
Exemple 1:
L'heure de gel quotidien est fixée à 3 heures. En supposant que l'heure actuelle est le 5 juillet à 02:00, alors lorsque l'heure atteindra 03:00 le 5 juillet, le compteur effectuera l'opération de gel de la consommation électrique quotidienne, en divisant la consommation électrique gelée du 4 juillet (du 4 juillet à 03:00 au 5 juillet à 03:00).
Exemple 2:
L'heure de gel quotidien est fixée à 20 heures. En supposant que l'heure actuelle est le 5 juillet à 02:00, alors lorsque l'heure atteindra 20:00 le 5 juillet, le compteur effectuera l'opération de gel de la consommation électrique quotidienne, en divisant la consommation électrique gelée du 4 juillet (du 4 juillet à 20:00 au 5 juillet à 20:00).
Conformément aux règles de gel ci-dessus :
Si vous interrogez la consommation d'électricité du 5 juillet pendant la période allant du 4 juillet à 20:00 au 5 juillet à 19:59, le compteur affichera 0. Parce que le compteur n'a pas atteint le point de temps de gel quotidien, la consommation d'électricité accumulée à ce moment est toujours la consommation d'électricité du 4 juillet.
Interrogez la consommation d'électricité du compteur le 5 juillet pendant la période allant du 5 juillet à 20:00 au 6 juillet à 19:59, la valeur de la consommation d'électricité cumulée actuelle est alors affichée.
Écran d'affichage auxiliaire
Sous l'écran d'affichage principal, appuyez sur le bouton 1 pendant 3 secondes pour accéder à l'écran d'affichage auxiliaire. À ce stade, un clic sur le bouton 1 permet de faire défiler la page à afficher. Sous l'écran d'affichage auxiliaire, vous pouvez appuyer sur le bouton 1 pendant 3 secondes pour revenir à l'écran d'affichage principal. S'il n'y a pas d'opération de bouton pendant plus d'une minute sous l'écran d'affichage auxiliaire, le compteur reviendra automatiquement à l'écran d'affichage principal.
Configuration
Le diagramme logique du menu de réglage des paramètres est le suivant :
Régler les paramètres de la classe de sortie d'impulsions
Les paramètres de classe de sortie d'impulsions incluent : le type de sortie d'impulsions, le débit de sortie d'impulsions et la largeur de sortie d'impulsions.
Régler les paramètres de classe de temps
Les paramètres de classe de temps incluent : le temps de rétroéclairage, le temps d'affichage à défilement automatique, l'heure système (RTC) et l'heure tarifaire.
Définir les paramètres d'alarme
Les paramètres d'alarme incluent : l'objet d'alarme, le seuil d'alarme, le temps de reconnexion automatique du relais, l'état d'alarme.
Relais contrôlé manuellement
Contrôle du relais : contrôle manuel de l'action de connexion ou de déconnexion du relais.
Alarme
Les produits de la série EAC2121C prennent en charge la fonction d'alarme, qui est associée au relais intégré du compteur. Selon les données de mesure en temps réel de l'objet surveillé et le seuil d'alarme défini, si les données mesurées dépassent le seuil défini, l'instrument déconnectera automatiquement le relais et déclenchera une alerte. La fonction d'alarme consiste à comparer chaque seconde les données mesurées de l'objet surveillé avec la valeur seuil d'alarme, afin de déterminer si la valeur seuil d'alarme est dépassée, et si c'est le cas, l'action d'alarme sera déclenchée.
5.1. Description des paramètres d'alarme
1. Objet de surveillance d'alarme : les paramètres de mesure associés à l'alarme. Le compteur compare les données des paramètres de mesure chaque seconde pour déterminer si le seuil d'alarme est dépassé, afin de décider de déclencher ou non l'alarme. L'objet de surveillance d'alarme prend en charge six paramètres de mesure. L'objet d'alarme spécifique est illustré dans le tableau 7-1 ci-dessous.
2. Seuil d'alarme : Lorsque les données mesurées de l'objet surveillé sont supérieures à ce seuil, un événement d'alarme sera déclenché.
3. Temps de reconnexion automatique du relais : Lorsque l'événement d'alarme se produit, après la déconnexion du relais, le compteur commencera le traitement du temps, et lorsque le temps de synchronisation est égal au temps de reconnexion automatique défini, le compteur reconnectera automatiquement le relais.
Remarque : Si le temps de reconnexion automatique du relais est de 0, cela signifie que le compteur ne se reconnectera pas automatiquement après l'alarme, et il doit être reconnecté manuellement.
Objet de surveillance d'alarme
Processus de réglage des paramètres d'alarme
Étape 1 : Liaison de l'objet de surveillance d'alarme.
Étape 2 : Définition de la valeur seuil d'alarme.
Étape 3 : Réglage du temps de reconnexion automatique du relais.
Remarque : Afin d'éviter que l'action d'alarme ne soit déclenchée par erreur lors du réglage des paramètres d'alarme, lors de l'entrée dans l'état de réglage des paramètres d'alarme, le compteur suspendra automatiquement la fonction de surveillance d'alarme, et lors de la sortie de l'écran de réglage des paramètres d'alarme, le compteur démarrera automatiquement la fonction de surveillance d'alarme pour éviter le déclenchement accidentel de l'alarme.
Processus d'action d'alarme
Une fois l'objet de surveillance d'alarme associé, le compteur compare les données mesurées et la valeur seuil d'alarme de l'objet surveillé chaque seconde. Si les données mesurées sont supérieures à la valeur seuil d'alarme, l'événement d'alarme sera déclenché et l'action d'alarme suivante sera exécutée immédiatement.
Action d'alarme du compteur :
1. Déconnecter le relais intégré du compteur.
2. L'écran LCD affichera l'icône d'alarme :
3. Génère un événement SOE et l'enregistre en mémoire.
Remarque :
1. Si la fonction de surveillance d'alarme de deux canaux est activée simultanément, le compteur effectuera l'action d'alarme en cas d'alarme sur l'un des canaux d'alarme.
2, lorsque le compteur déclenche une alarme, si la fonction de reconnexion automatique est activée, lorsque le temps de reconnexion automatique est atteint, le relais se reconnectera automatiquement, sans intervention manuelle. Si le temps de reconnexion automatique est défini à 0, le relais doit être reconnecté manuellement. Le mode de fonctionnement de fermeture manuelle du relais prend en charge l'opération par clé et l'opération de communication à distance.
Annexe A – Tableau de définition des caractères LCD
Annexe B – Tableau de référence des codes de panne
Annexe C – Tableau de comparaison des messages d'alarme
Annexe D – Tableau d'état des indicateurs d'état
Paramètres réseau (Zigbee)
Étape 1 : Une fois le câblage effectué selon le schéma de câblage du compteur, alimentez le compteur.
Étape 2 : D'abord, appuyez longuement sur le bouton gauche (bouton 1) pendant 3 secondes pour entrer dans l'interface auxiliaire, puis appuyez longuement sur le bouton droit (bouton 2) pendant 3 secondes pour que le compteur entre en mode de distribution réseau.
Étape 3 : Ouvrez l'application Tuya smart, et cliquez sur le bouton Ajouter un appareil pour sélectionner "Compteur intelligent (Zigbee)" dans la catégorie "Énergie"
Étape 4 : Sélectionnez une passerelle Zigbee à ajouter selon les besoins
Étape 5 : Confirmez d'abord que le compteur électrique est en mode réseau (le voyant clignote rapidement), puis cliquez sur le bouton "Suivant" pour fonctionner selon les invites afin de terminer l'opération réseau.
❓ Questions Fréquemment Posées
❓ 1 - Fournissez-vous des services d'installation ?
❌ Non, nous ne le faisons pas. Veuillez noter que nous ne fournissons pas de conseils techniques personnalisés ni de services d'installation, car les besoins des clients varient considérablement selon les régions.
🌍 2 - Expédiez-vous dans mon pays ?
Oui, nous livrons dans le monde entier. Les produits sont expédiés par des fournisseurs situés en Amérique du Nord, en Europe et en As, avec des délais de livraison de 5 à 15 jours ouvrables.
⏳ 3 - Quel est le délai de livraison ?
Le délai de livraison est de 5 à 15 jours ouvrables.
💳 4 - Comment puis-je payer ?
Paiements acceptés via Stripe : carte de crédit, carte de débit et Apple Pay — le tout directement sur notre site web.
📄 5 - Où puis-je trouver les informations techniques ?
Toutes les informations techniques sont disponibles sur la page de vente du produit.
❓ 6 - Puis-je demander un devis ou une estimation ?
🚫 Aucun devis n'est nécessaire. Vous pouvez acheter tous les produits directement via notre site web avec une tarification transparente.
🖼 Images du produit